The first woman to wear a men's tie was the favorite of Louis XIV, Louise de La Vallière. It is unlikely that she expected that this accessory will take its rightful place on modern fashion catwalks. The dress code obliges men to match a tie to a shirt, tighten the knot tightly, use clips.
It's easier for women. Some negligence is welcome. A neckerchief can be replaced with a tie, worn with a blouse, dress, worn on a naked body. But the accessory still imposes some obligations on the beautiful half. It will not be superfluous to study the step-by-step instructions on how to tie a tie correctly, mastering the key techniques for forming an image.
So, how to tie a tie: step by step instructions - further in our article.
Video: womens ways to tie a men's tie

Tie effect
A tie visually slims and elongates the silhouette. The effect is expected to be the same as how to tie a maxi-length scarf and wear high-heeled shoes. Great women, Marlene Dietrich, George Sand used the tie as a secret weapon. The accessory betrays a self-confident lady, but also obliges to straighten her shoulders, straighten her back, look with an open look, and be wary of other jewelry.

Women's ties are universal things. They can be used in different styles:
- business, with a trouser suit and blouse;
- military. Combi - partners for a short, simple knotted tie, straight tight skirt and shirt;
- dandy. For this style, it is worth choosing monophonic models;
- country. The accessory looks great in a cowboy hat and a dress, a plaid shirt;
- romantic. Ladies are not forbidden to wear a tie on a naked body, under a shirt. “Wow” the effect is guaranteed along with.
A modern women's tie is a source of inspiration for designers and needlewomen. Models are sewn from fabric, leather, crocheted, beaded, decorated using the batik technique, or simply “take” a couple of items from the wardrobe of the second half. In any form, the accessory looks stylish, but it is important to learn how to tie a women's tie.
Video: Trinity knot for Beginners step by step | How to tie a tie

Knot techniques
Ladies who already know how to tie a scarf around your neck beautifully will quickly master the technique of knots. There are no strict canons: the accessory can simply be thrown over the neck with a cross or tie a tie in the simplest way. But if you want to create a strict business look, you should master a few men's tie knots.
For a better understanding of the algorithms, let's learn the terms: the wide part of the tie is called the proscenium, the narrow part is called the back, the central one is the collar.
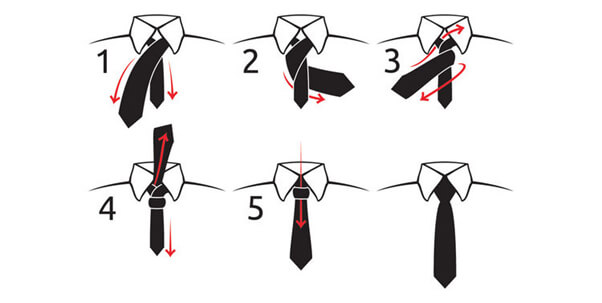
“Simple” or “four”
Four-in-Hand, “simple”, four - the names of the classic knot, which is used for all types of neck accessories. Execution algorithm:
- throw the product over the neck, placing the narrow section on the right;
- cross backdrop and proscenium and make one turn;
- circle the wide side around the heel;
- pass it between the knot and the collar;
- pass through the resulting pocket.
The final steps are adjusting the length and tightening the knot.
“Windsor”
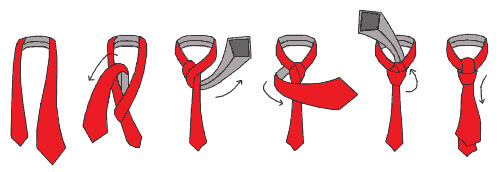
A tie decorated with “Windsor” good with feminine silk blouses, suitable for accessories made from elastic fabrics. To get a node, follow these steps:
- throw a collar around the neck so that the left end is longer than the right;
- to superimpose the proscenium and the backdrop on each other with a cross;
- skip the left end from bottom to top into the resulting loop;
- lower the left end, wrap it around the right end, lift it up again and throw it over the upper zone of the neck loop;
- pass the left end of the tie into the loop formed once more.
The technique should not be mastered immediately before the event, it is better to practice in advance.
Video: 5 Amazing Ways to Tie a Tie

Pratt-Shelby
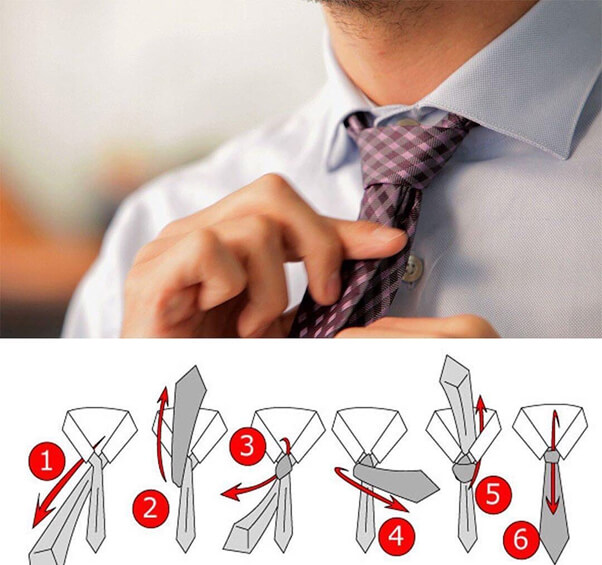
The Pratt knot first appeared in the late 1990s. It was invented by two people: Jerry Pratt, an employee of the American Chamber of Commerce and TV presenter Don Shelby. Jerry Pratt hid his invention for more than 30 years, until Shelby demonstrated the knotting scheme on TV.
The knot has several synonymous names: inverted half-Windsor, American, Shelby. Tying technique:
- turn the product on the wrong side, the wide part is located below the narrow one;
- cast the wide end up, directing it to the right along the top to the neck loop;
- pass the wide end through the neck loop from top to left down;
- stretch it into the resulting eye;
- tighten the knot.
The Pratt knot is quite easy to master, looks neat and effective.
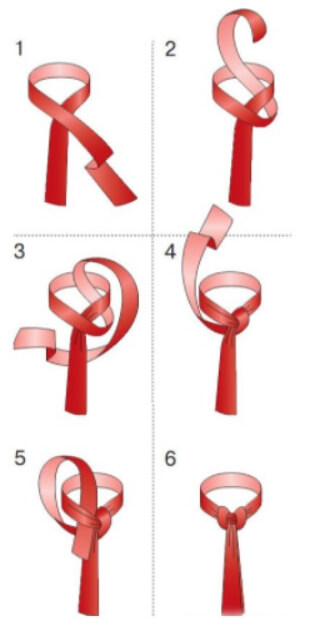
Wismar Knot
This option is a variation of the one described above. The knot looks best on models made of fabrics without patterns. An important condition is that the ends of the accessory must be the same width. The technique is shown in the figure.
Male “false knot”
It is from this option that you should start learning how to tie a tie for ladies without practice. Procedure:
- throw the product around the neck so that the right end is longer than the left;
- with the long end go around the short one so that an eye is formed;
- pass the long end through the eye.
The resulting knot needs to be tightened and straightened.
Video: 4 cool ideas on how to tie a tie

Is there a taboo?
A lady wearing a tie conveys efficiency, sexuality, originality, femininity, provided that the accessory is chosen with a sense of style. In order not to look comical, not to achieve the opposite effect, it is worth knowing when and how not to wear a tie.
Stylists do not advise women with large breasts to use this item, to wear a tie on a naked body under a jacket in the office, at official events. A winning option only at a party or a romantic date.
How many ways to tie a tie? Previously, 85 techniques were known, but recent mathematical studies have shown that there are more than 177,000 ways to do this. The average man owns three or four. It is enough for the fair sex to master the methods described above, show imagination, develop an aesthetic sense when creating fashionable images.
Video: How to tie a tie like a BOSS !! Merovingian knot




Comments (1)
2. Lift the wide side of the tie and fold it over the narrow side.
3. Then pass the wide side of the tie around the narrow side and pinch it with your fingers.
4. Wrap the wide side of the tie over the narrow side and fold it over the narrow side again.
5. Continue tying the tie, repeating this process one or two more times, depending on the length of the tie.
6. When you only have the short end of the tie, pass it through the loop on your shirt collar and fold the loop down to secure the tie.
7. Stretch the tie and align the knot to your liking.